Overview
Targeting Groups describe which visitors can see your content, based on a set of Targeting Rules or conditions that you specify and whether or not they match these conditions.
For example, you can deliver optimized and personalized content to visitors who
- Visit your site on a specific date or at a specific time of day
- Visit your site on certain devices or browsers
- Visit your site from certain sources (search engine, social media sites) or geolocations (regions, states, countries and zipcodes)
- Have viewed or interacted with certain parts of your site
- Have filled out a form and entered or selected certain field values
- Have a profile in your backend systems or any third party CRM or Marketing automation platform
CrownPeak’s WCO Targeting platform offers the best experience to manage, optimize and personalize your visitors’ web experience, directly in the CMS since it:
- Is fully and directly integrated in the CMS authoring experience
- Leverages a simple drag and drop user interface to ensure ease of use
- Requires NO reading, editing, or copying of code
- Is designed to integrate with third party systems such as CRM’s and Marketing Automation Systems
- Contains a number of the most popular Targeting Group examples to get you started
- Offers a large number of Targeting Rules to choose from including time, date, geolocation, browser, device, form fields, querystring parameters, page views and conversions, backoffice and 3rd party attributes, and more
- Can store hundreds of custom Targeting Groups and Targeting Rules combinations
- Measures your marketing campaign success via the Analytics and Optimization Dashboards
How to Use Targeting Groups
The CrownPeak CMS allows authors and editors to vary the content of WCO snippets which can be applied to Text and WYSIWYG controls, directly within your CMS pages.
Be sure to review the CMS Monthly Tip below for instructions on how to enable WCO in your templates.
Creating and managing a targeting campaign within the CrownPeak CMS is easy, and is done by defining your content variants in a WCO Snippet, and the associated Targeting Groups that describe the visitors you want to target. Both new and existing Targeting Groups can easily be managed via a new drag and drop user interface allowing the author to select from a number of Targeting Rules to define the audience or persona they want to target.
CrownPeak’s Targeting Rules fall into the following categories
- Ambient: Data or attributes that are readily available for all visitors including anonymous visitors
- Source: This data describes how the visitor arrived at your site
- Demographic: This data shows what is known about the user from their web connection
- Behavioral: This data describes the visitor’s interactions and engagement level on your site by tracking page views, and conversions
- Form: This data is collected from any form on your site
- Integration: This data is retrieved from your backend system, or any 3rd party system via WCO’s connectors
CrownPeak provides the following Targeting Rules to create your Targeting Groups with:
| # | Rule Type | Use Case | Example |
|---|---|---|---|
| 1 | Time | Targets users based on time of day they visit the site | Target "at word" visitors if they divist during the day and "at home" if they visit in the evening |
| 2 | Date | Target users based on date or date-range they visit the site | Deliver content at beginning, before, after or during a campaign |
| 3 | Device | Target user based on device and browser or on a custom condition in their browser agent | Deliver relevant content to iPhone or Safari users or based on their specific Operating System |
| 4 | Referrer | Target users based on the previous site they were on prior to arriving at yours | Identify users from search engines, social media sites or partner sites |
| 5 | Location | Identify and target users from specific regions, states, countries or zip code ranges | Target users in Texas |
| 6 | Snippet | Target users who view any snippet on any page in your site | Track user interest based on pages viewed |
| 7 | DemandBase* | Target users with specific DemadBase attributes based on their IP address | Identify competitors, partners, and/or potential customers in various industry segments |
| 8 | Marketo* | Target users based on their Marketo profile | Optimize your visitor's site experience with data from Marketo |
* Require third party integration
This version of the WCO Targeting Groups includes a number of common Targeting Group examples to get you started:
| # | Targeting Group Name | Use Case | Example |
|---|---|---|---|
| 1 | iPhone Users | Identify users visiting the site on their iPhone | Promote your iPhone app to iPhone users |
| 2 | Android Users | Identify users visiting the site on any Android device | Display store location information to Android users |
| 3 | Mobile Users | Identify users visiting the site on any mobile device | Display store location information to mobile visitors |
| 4 | iPad Users | Identify users visiting the site on their iPad | Promote your iPad app to iPad users |
| 5 | IE Users | Identify users visiting the site using the IE browser | Deliver optimized CSS or JS based on IE version |
| 6 | Chrome Users | Identify users visiting the site using the Chrome browser | Deliver optimized CSS or JS based on Chrome version |
| 7 | Safari Users | Identify users visiting the site using the Safari browser | Deliver optimized CSS or JS based on Safari version |
| 8 | US Visitors | Identify visitors from the US | Deliver contents exclusive to US visitors |
| 9 | EU Visitors | Identify visitors from the EU | Deliver contents exclusive to EU visitors |
| 10 | Canadian Visitors | Identify visitors from Canada | Deliver contents exclusive to Canadian visitors |
| 11 | East Coast Visitors | Identify visitors from the East Coast of the US | Deliver special announcements and notifications |
| 12 | West Coast Visitors | Identify visitors from the West Coast of the US | Deliver special announcements and notifications |
| 13 | Google Visitors | Identify visitors who conducted a Google Search prior to arriving at your site | Highlight Site Navigation and Site Search to help Google Visitors find the content they’re looking for |
| 14 | Bing Visitors | Identify visitors who conducted a Bing Search prior to arriving at your site | Highlight Site Navigation and Site Search to help Bing visitors find they content they’re looking for |
| 15 | Yahoo Visitors | Identify and target visitors who conducted a Yahoo Search prior to arriving at your site | Highlight Site Navigation and Site Search to help Yahoo visitors find they content they’re looking for |
| 16 | Facebook Visitors | Identify visitors who engaged with your Social Media campaign that redirected them to your site | Extend offers to Facebook visitors |
| 17 | Twitter Visitors | Identify visitors who engaged with your Social Media campaign that redirected them to your site | Extend offers to Twitter visitors |
| 18 | LinkedIn Visitors | Identify visitors from LinkedIn who would like to learn more about your company | Redirect LinkedIn visitors to About Us page or Careers section |
How to Launch Targeting Groups
There are different ways to launch the Targeting Groups Interface depending on where you are in the CMS.
In Edit Mode
1. Navigate to the [Content] section of the CMS
2. Select an asset in [List View]
3. Open the selected Asset in [Edit] mode
4. Select any WCO control on the page
5. A set of actions will appear in the white menu bar just below the content block
6. If you already have a snippet, skip to step 7. Otherwise click on [Create Snippet] to create a new snippet. Enter a snippet name when prompted.
7. Click on [Add Targeting Variant] to define a new content variant
8. Enter a name for your new variant
9. Associate the variant with a Targeting Group either by selecting one from the dropdown, or by clicking on [Create Targeting Group] which will launch WCO’s Targeting Groups interface
10. Refer to the Creating and/or Editing a Targeting Group section below for detailed instructions on how to create a new Targeting Group
11. Once created, the Targeting Group will now be available for selection from the Targeting Group dropwdown
12. Enter your optimized content for your newly created and/or selected Targeting Group
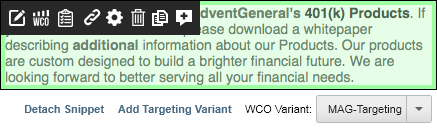
Figure 1 – WCO Controls in In-Context-Editing Mode
In Form Mode
1. Navigate to the [Content] section of the CMS
2. Select an asset in [List View]
3. Open the selected Asset in [Form] mode
4. Locate any WCO control in the Form. WCO Controls are easy to identify as they are labeled accordingly
5. If you already have a snippet, skip to step 6. Otherwise click on [Create Snippet] to create a new snippet. Enter a snippet name when prompted. Alternatively, you may attach an existing snippet from the snippet dropdown.
6. Click on [Add Targeting Variant] to define a new content variant
7. Enter a name for your new variant
8. Associate the variant with a Targeting Group either by selecting one from the dropdown, or by clicking on [Create Targeting Group] which will launch WCO’s Targeting Groups interface
9. Alternatively, you may also click on the Variant Settings Icon (3rd from the right), where you may click on [Manage Targeting Groups] which will also launch WCO’s Targeting Groups interface
10. Refer to the Creating and/or Editing a Targeting Group section below for detailed instructions on how to create a new Targeting Group
11. Once created, the Targeting Group will now be available for selection from the Targeting Group dropwdown
12. Enter your optimized content for your newly created and/or selected Targeting Group

Figure 2 – WCO Controls in Form Mode
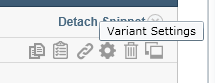
Figure 3 – WCO Variant Settings (3rd Icon from right)
In Preview Mode
You can preview your content variants by selecting the Targeting Group or Profile from the Profile Panel. You may also edit and adjust the targeting rules as necessary, while in Preview Mode
1. Navigate to the [Content] section of the CMS
2. Select an asset in [List View]
3. Double Click on the asset, or Open the selected Asset in [Preview] mode
4. Expand the [Overview] Panel, located in the right side Accordion.
5. Click on the [Profile] tab
6. Click on any Profile from the list to preview the associated optimized content in Preview Mode
7. If needed, you can click on [Edit Profile] to launch WCO’s Targeting Groups interface
8. Refer to the Creating and/or Editing a Targeting Group section below for detailed instructions on how to edit the selected Targeting Group
9. Once edited, you will be back in Preview Mode, and you may continue authoring or editing your content
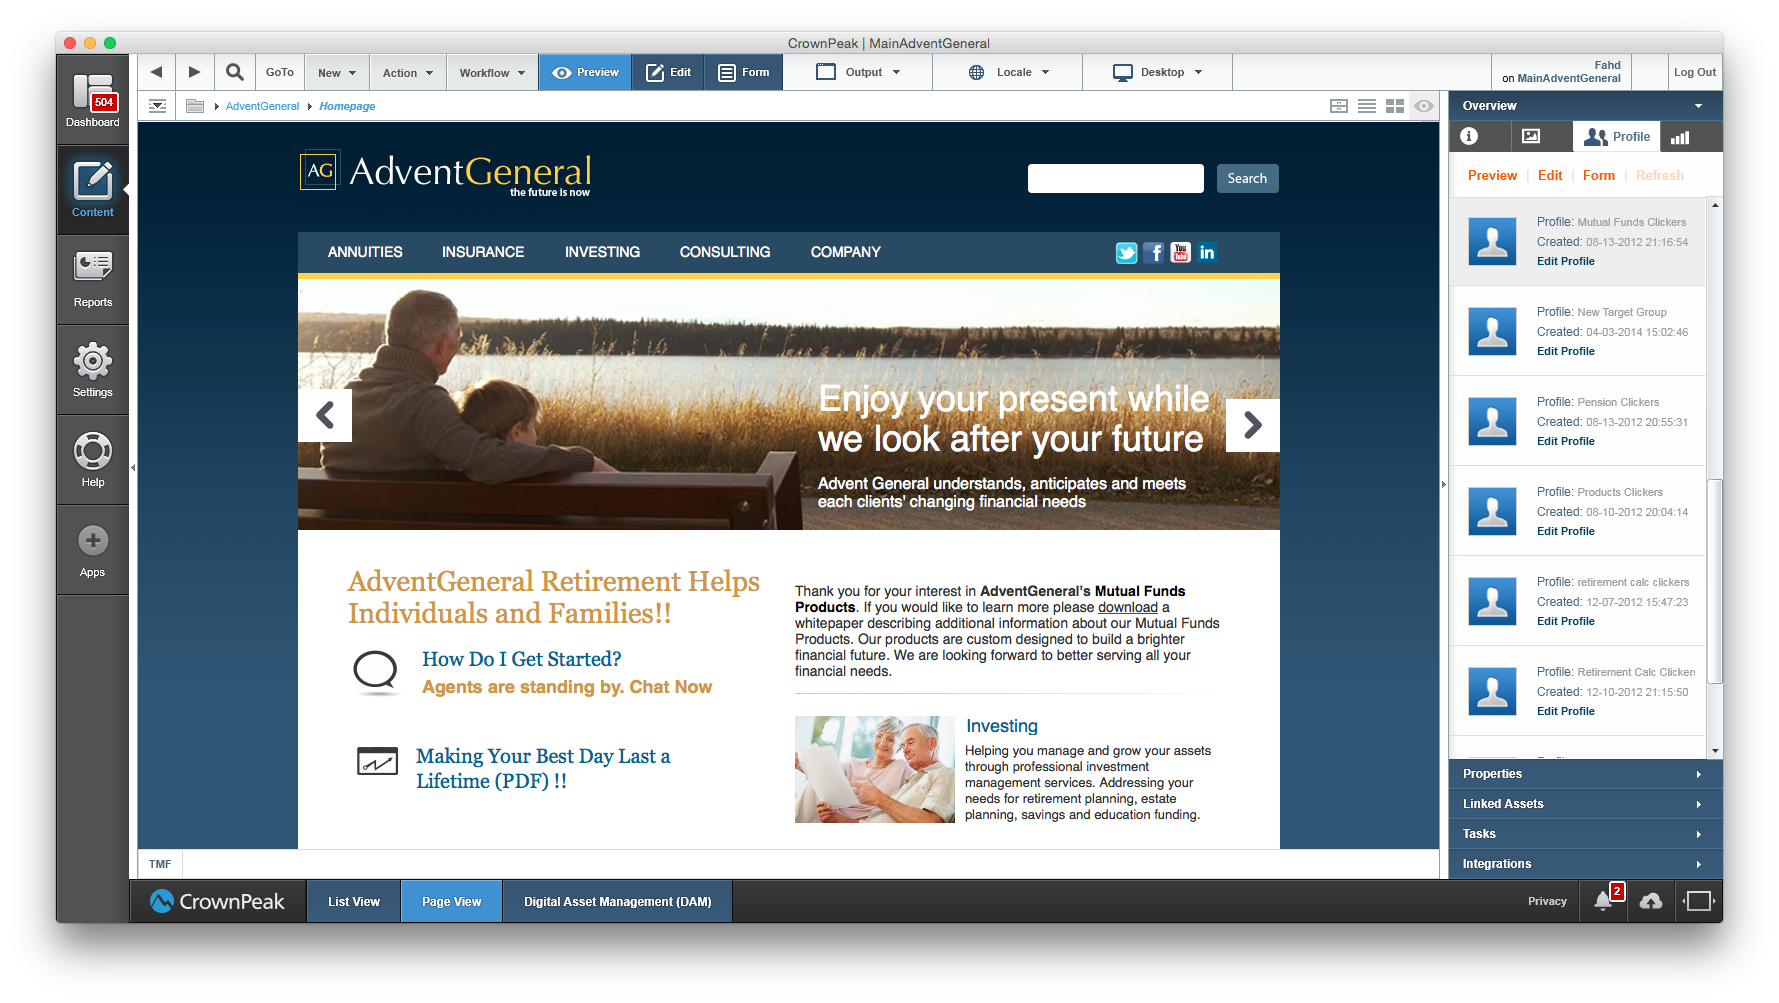
Figure 4 – WCO Profiles in Accordion Panel
In Settings
1. Navigate to the [Settings] section of the CMS
2. Select [Testing and Targeting]
3. Select the [Targeting Group] option to launch WCO’s Targeting Groups interface
4. Refer to the Creating and/or Editing a Targeting Group section below for detailed instructions on how to edit the selected Targeting Group
Creating and/or Editing a Targeting Group
1. Launch the Targeting Groups interface (refer to above modes and associated instructions)
2. To create a new targeting group, select the [New Group] button (Figure 5)
3. To edit an existing targeting group, click the [Edit] link next to one of the pre-existing forms in the table
4. The WCO Drag & Drop Targeting Group window will appear (Figure 6)
5. Enter a name in the [Group Name] field at the top of the page
6. Optional: Add an image for the Targeting Group
a. Click [Profile Photo]
b. In the [Upload Photo] window, select [Browse]
c. Select and image from your drive and click [Open]
d. In the Upload Photo window click [Upload]
e. The selected image will be displayed for your targeting group
7. Select from the list of 11 [New Rule] or custom [Existing] rule types
8. Drag the desired rules(s) into the targeting group
9. Click [Edit] next to each new rule and enter the rule criteria
10. Save the Targeting Group by clicking the [Save] button
11. The Group Saved Message will appear and the Targeting Group is ready to use within WCO
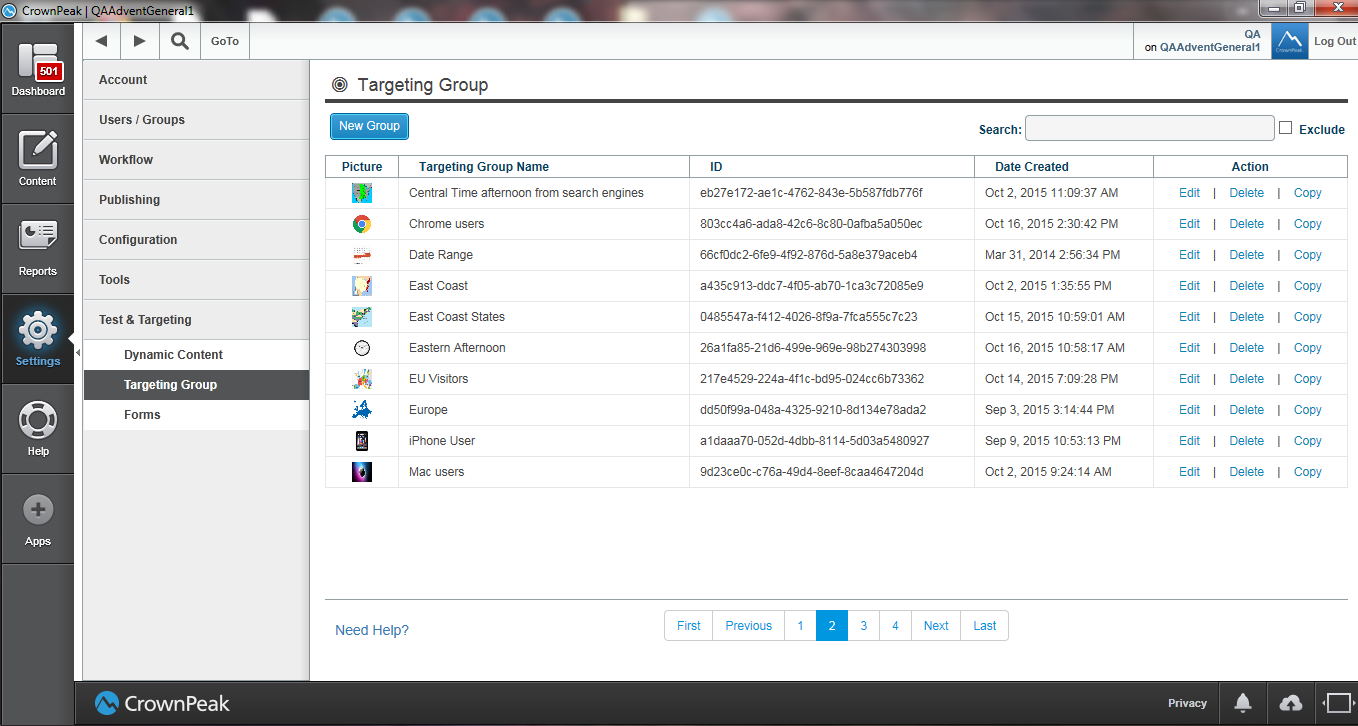
Figure 5 – Targeting Groups - Main Page
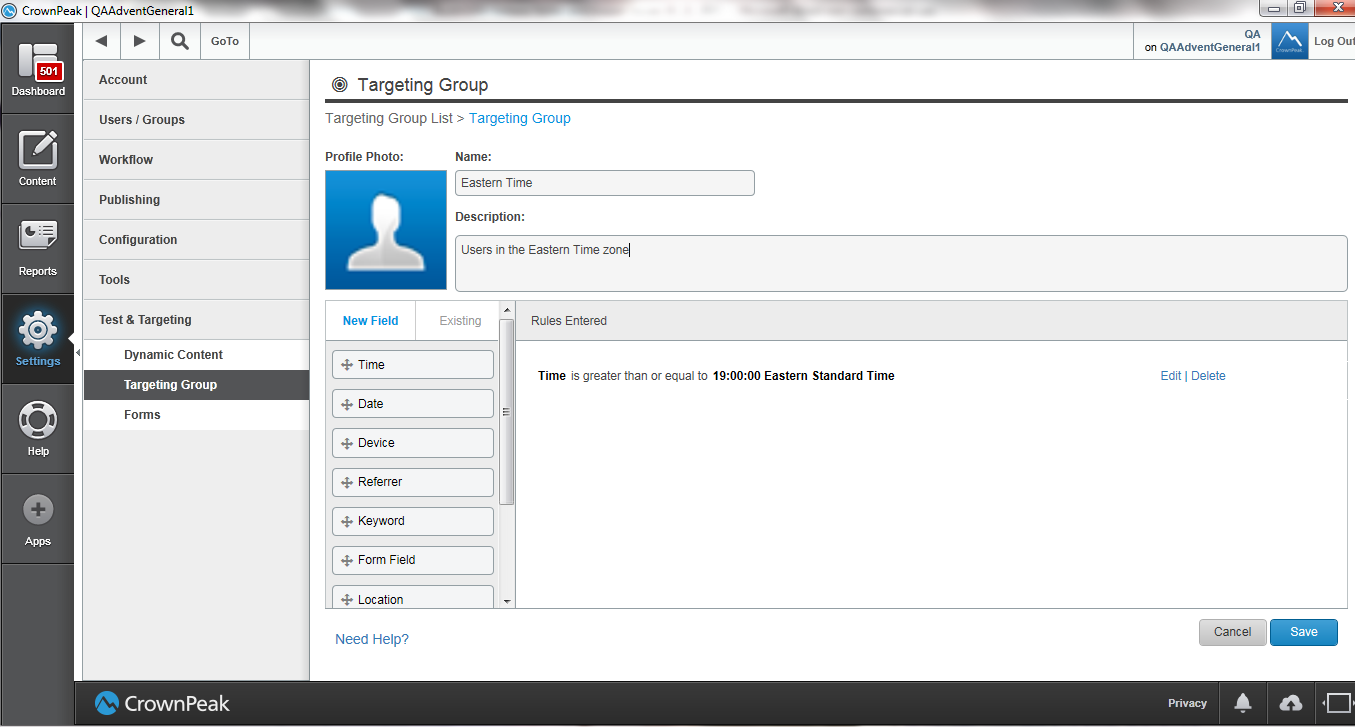
Figure 6 – Targeting Groups - Rules Page
Targeting Groups Tips and Tricks
Does WCO support AND and OR logical operations?
WCO automatically inserts an “AND” after every Targeting Rule. This allows you to create target audiences that are as specific as your business requirements dictate.
In cases where you need to deliver the same content to different target audiences, WCO provides a number of techniques to facilitate this requirement
- Most WCO Targeting Rules support an [Is Contained In] and [Is Not Contained In] logical operations which allow you to define any number of values you would like to match against. These values should be clearly delimited by a space, comma, or a pipe
Examples:
Demographic: Geo-Location: State is contained in CA, NY, TX
Form: Field Value: JobTitle is contained in “Marketer”, “Project Manager”, “IT Developer” - Certain Ambient attributes such as Browser and Device provide checkboxes to select from. You may choose one or more checkboxes with an implied OR
Examples:
Ambient: Browser: Chrome, Safari, IE
Ambient: Device: iPhone, Android, Blackberry - Behavioral attributes natively support OR operations due to the parent/child relationship between Snippets and their variants, as well as between Variants and embedded Conversion links., by selecting the parent snippet which will report on all embedded variant views (essentially an OR between the variants), or by selecting a variant which will report on all embedded conversion links (essentially an OR between the conversion links).
Examples:
Behavioral: Views: all variants of a particular snippet (essentially an OR between the variants)
Behavioral: Conversions: all conversions of a particular variant or snippet (essentially an OR between all the conversion links) - WCO also allows you to repeat the same variant, as many times as you like within a snippet. These identical variants can be associated with any Targeting Group, allowing you to deliver the same content to different target audiences.
How to pass custom parameters or values to a WCO Snippet for targeting purposes?
WCO recognizes any custom parameters included in the snippet’s Javascript call, and exposes these parameters for targeting purposes as Form Field values.
This capability is extremely useful in instances where you need to pass user profile specific attributes to WCO in real-time, or asset specific parameters to the WCO snippet.
Note: This data is not stored in WCO and will not impact your conversion counts.
For example, let’s say we need to pass the label or the page that is delivering the WCO snippet. To add this custom real-time attribute to WCO, add the following code to your Output Template
<%= asset["wco_snippet"].Replace("\" ></script>", "?asset =” + asset.Label + “\" ></script>")%>
The code above will produce the following output
<script type="text/javascript" src="//snippet.omm.crownpeak.com/s/2c4764a1-b91d-4d37-9aeb-eaabecfa2fc2?asset=Homepage" ></script>
The custom attribute will now be targetable in WCO as a Form Field Value.
How to preview my optimized experiences in the CMS?
The CrownPeak CMS provides an intuitive interface directly within the authoring experience to preview your content variations for each of the Targeting Groups you’ve defined.
While previewing and/or editing an asset, the [Overview] panel, found in the right side Accordion includes a new [Profile] tab which lists all of the Targeting Groups used on the page. Clicking on any Profile (which is the same as a Targeting Group), will result in re-rending the page in real-time reflecting what the targeted audience would see
How to test geo-location, browser and device optimized experiences in a browser?
Besides testing and validating the content and web experience in Preview mode directly in the CMS, as described in previous tip, you can also test the experience post-publishing in your supported browsers, and devices. You may also test the content and experience from various geographical locations.
To simulate visiting the site from different devices and browsers:
Look for browser extensions that facilitate changing the browser’s User Agent to simulate different devices and browsers.
To simulate visiting the site from geographical locations:
Look for browser extensions that provide Proxy and VPN functions which will simulate visiting the site from different geographical locations.