Overview
The CrownPeak WCO Form Builder is often the best choice for your web site since it:
- Is ideal for the fast creation of Landing Pages (LP) as part of your marketing campaigns
- Leverages a simple drag and drop user interface to ensure ease of use
- Requires NO reading, editing, or copying of code
- Is built to integrate with marketing automation software
- Contains 5 of the most popular form examples to get you started
- Offers 14 field types to choose from including date, phone, email, currency and more
- Can store hundreds of custom fields and form combinations
- Measures your marketing campaign success via the Analytics and Optimization Dashboards
Landing pages are single web pages designed around a specific marketing campaign and often linked from social media posts, email distributions, or search engine marketing efforts and typically organized through automation software vendors such as Marketo, Salesforce, and Eloqua. The general goal of a landing page is to convert site visitors into sales leads by filling out a form and clicking on a ”Call to Action” button or link. The success of the marketing campaign can be measured by counting the number of website visitors that view (“Visits”) and then complete the form (“Conversions”). Detailed analytics can also be used to determine the browsers, operating systems, screen resolutions, languages, and sources of the visitor traffic to your landing pages.
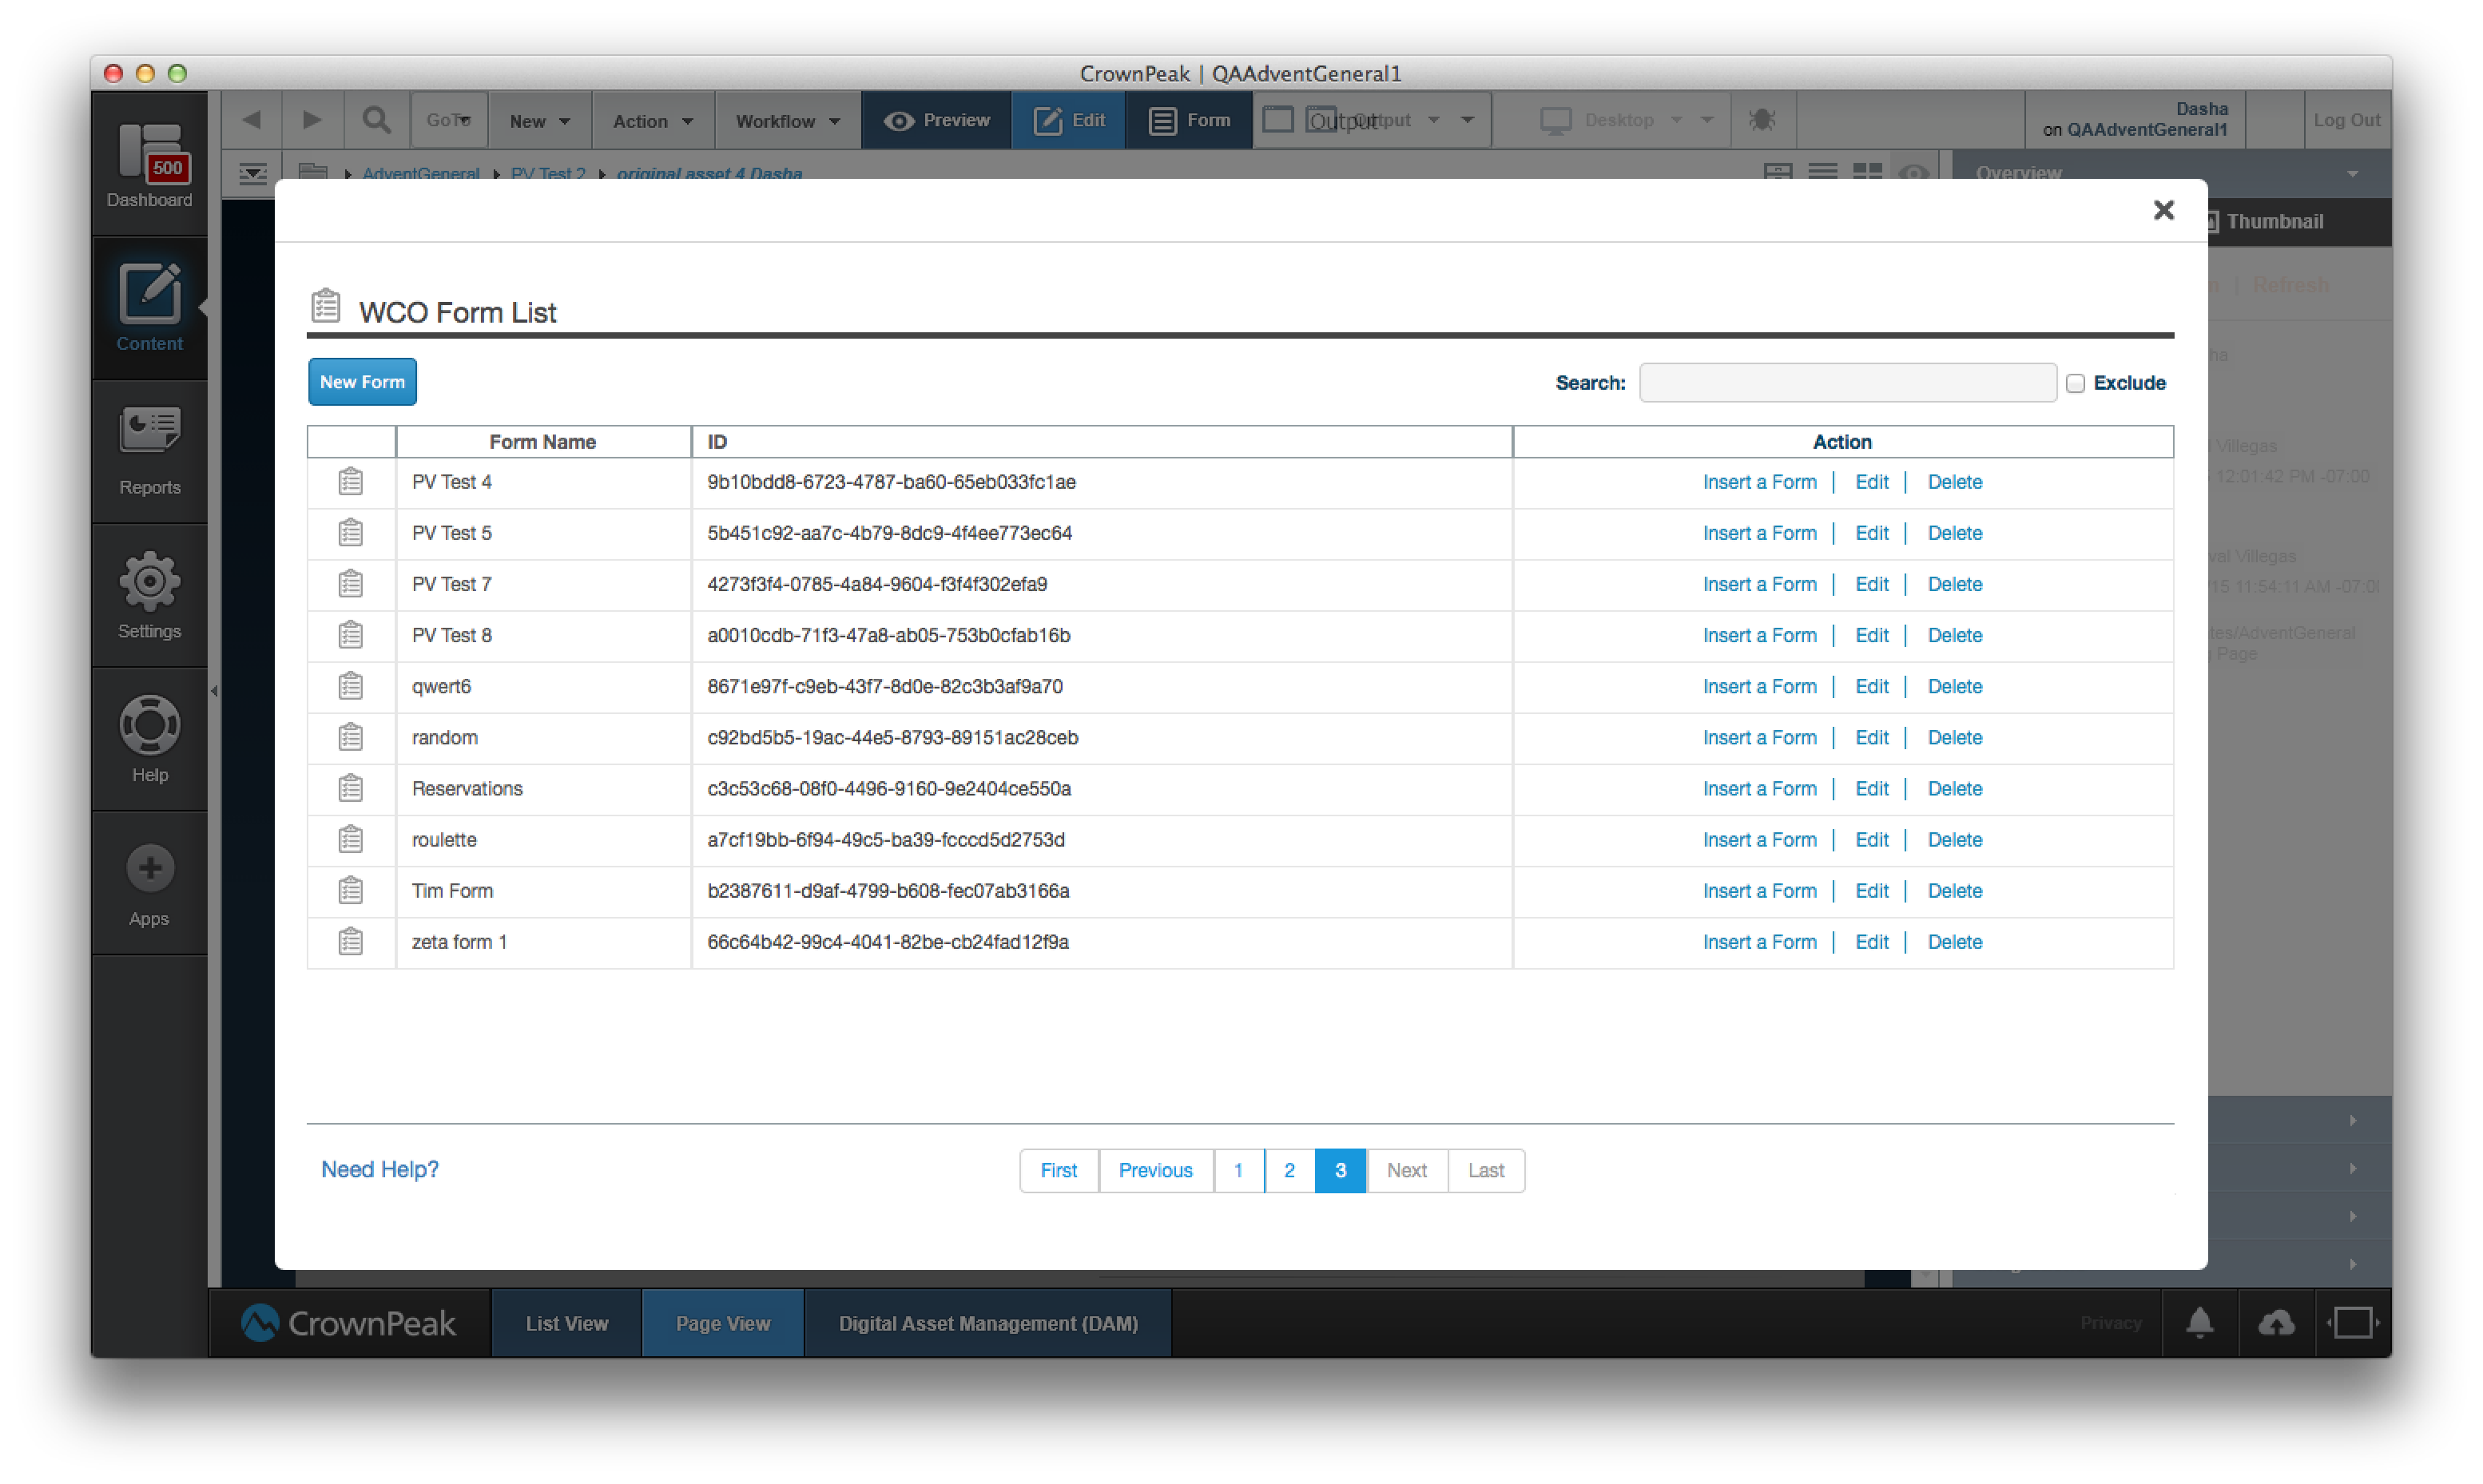
Figure 1 – Form Builder - Summary View
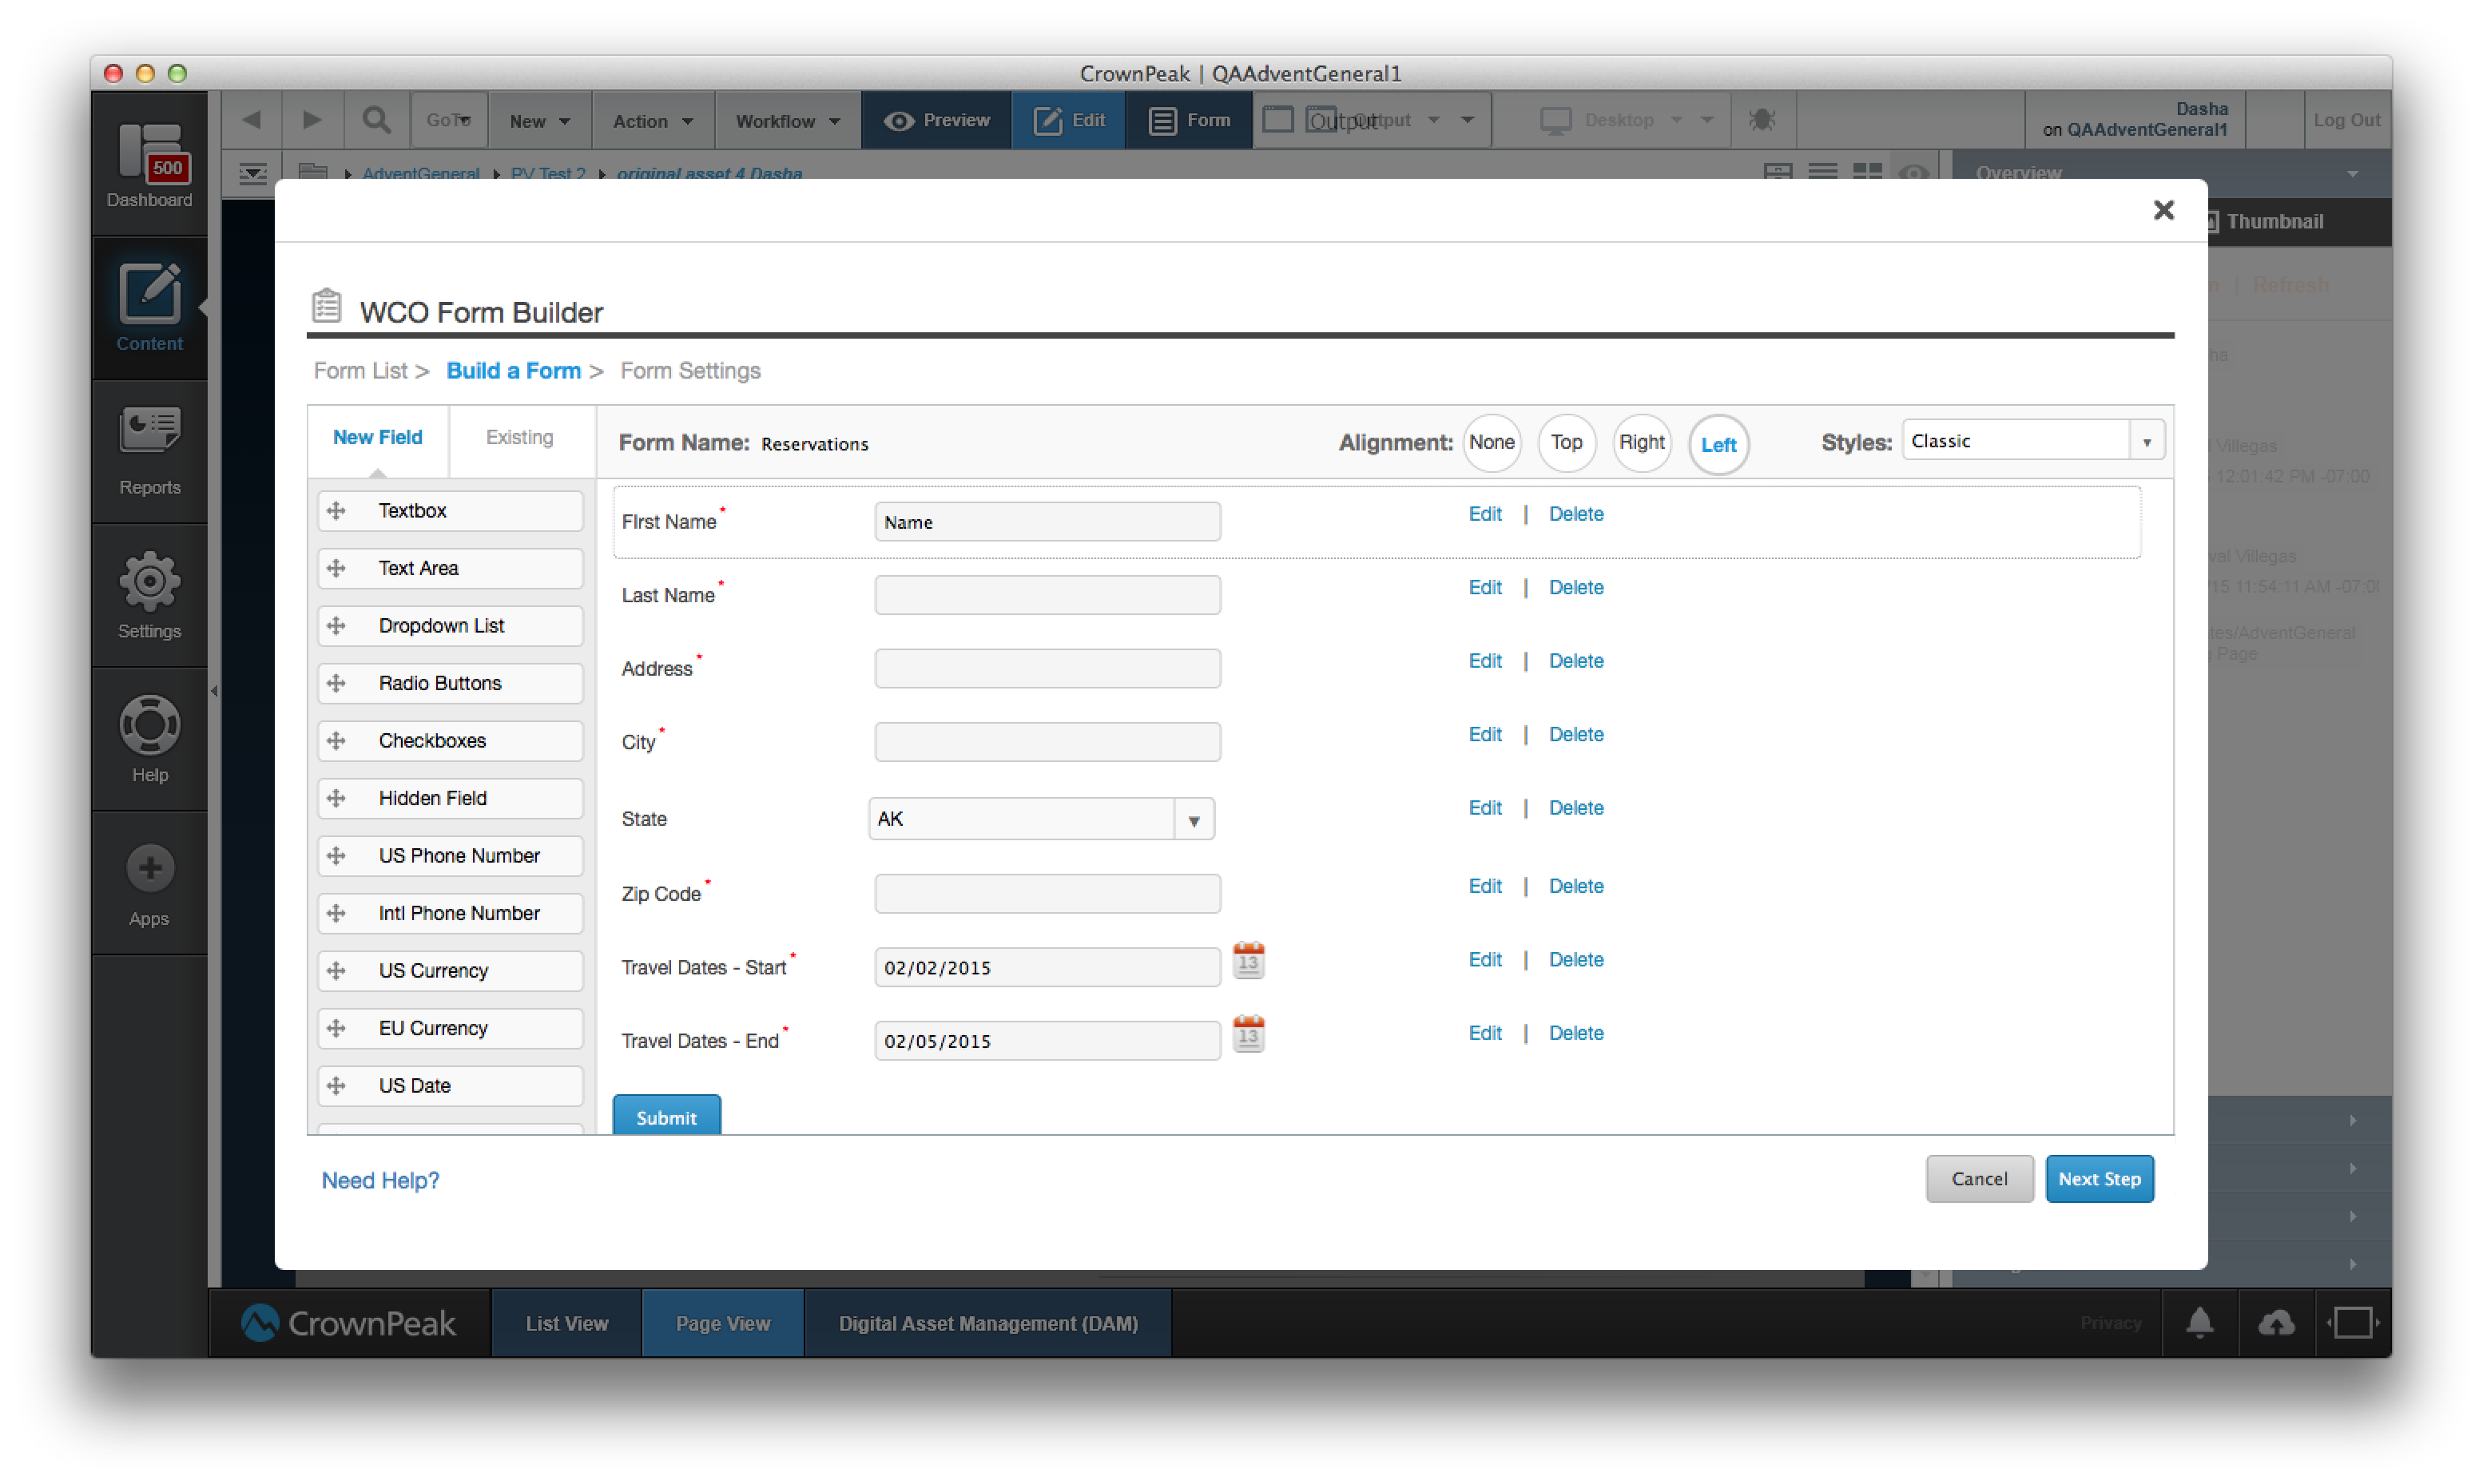
Figure 2 – Form Builder – Detail View
How to Use the WCO Form Builder
Both new and existing forms can easily be managed via a new drag and drop user interface available directly in the CMS authoring experience. This version of the WCO form builder includes 5 of the most popular form examples to get you started:
| # | Form Name | Use Case | Fields in Form |
|---|---|---|---|
| 1 | Email Only | Low risk visitor contact info collection | |
| 2 | Email & Twitter | Low risk visitor contact info via social media | Email, Twitter |
| 3 | Name & Comment | Basic contact info without phone | Name, Email, Comment |
| 4 | Name & Phone | Basic contact info with phone | Name, Email, Phone |
| 5 | Name & Address | Complete contact information | Name, Address, City, State, Zip |
CrownPeak has also defined 14 field types to create your forms with including:
| # | Field Type | Use Case | Can Be Used For |
|---|---|---|---|
| 1 | Textbox | A general purpose control | Name, Email |
| 2 | Text Area | Offer visitors a space for feedback | Comments |
| 3 | Dropdown List | Presents lists of states, regions | State, Industry |
| 4 | Radio Buttons | Select one item from a list | Yes, No |
| 5 | Checkbox | Select one or more item in a list | Monday, Tuesday, Wednesday |
| 6 | Hidden Fields | Values to be passed onto a vendor | Asset_Id |
| 7 | US Phone Number | Formated for US phone numbers | Format: 123-123-1234 |
| 8 | Int Phone Number | Formatted for EU phone numbers | Format: +1 123 12 1234 |
| 9 | US Currency | Formatted as US currency | Format: 10,000 |
| 10 | EU Currency | Currency formatted for EU visitors | Format: 10.000 |
| 11 | US Date | Dates formatted for US visitors | Format: MM/DD/YYYY |
| 12 | EU Date | Date formatted for EU visitors | Format: DD/MM/YYYY |
| 13 | Email Addresses | Format: you@mycompany.com | |
| 14 | URL | HTTP(s) URL | Format: www.mycompany.com |
Here are the 10 field properties that can be configured to create each of the form fields:
| # | Field Properties | Definition | Required |
|---|---|---|---|
| 1 | Char Max Length | The maximum/length of the field | Yes |
| 2 | Field Name | The unique name of the field in the form | Yes |
| 3 | Field Placeholder | A text hint inside the field that describes the expected value & format. The hint disappears after the visitor clicks in the field. | No |
| 4 | Initial Field Value | The initial or default value of the field | No |
| 5 | Is Required | Indicate if this field is required in the form | Yes |
| 6 | Label | The text that will be displayed next to the control | No |
| 7 | Number of Options | Number of values in lists, checkboxes, and radios | Yes |
| 8 | Predefined Patterns | A collection of predefined patterns based on common field types (date, currency, phone, etc.) | No |
| 9 | Validation Pattern | A regular expression used to ensure the correct values are entered in the field | No |
Steps to Create & Edit Forms
Here are the steps to create or edit an existing form using the CrownPeak WCO drag and drop Form Builder:
1. Navigate to the [Content] section of the CMS
2. Select an asset in [List View]
3. Open the selected Asset in [Edit] mode
4. Select any WCO control on the page
5. A set of icons will appear in the black toolbar just above the content block
6. Click the [Build a Form] icon (3rd from the left)
7. To create a new form, select the [New Form] button (Figure 1)
8. To edit an existing form, click the [Edit] link next to one of the pre-existing forms in the table
9. The WCO Drag & Drop Form Builder window will appear (Figure 2)
10. Enter a name in the [Form Name] field at the top if the page
11. Select from the list of 14 [New Field] or custom [Existing] field types
12. Drag the desired field(s) into the form
13. Click [Edit] next to each new field and complete at least the required properties
14. Step through the form wizard by clicking through the [Next Step] button
15. Review the values in the [General], [Notifications], [Rules], [Auto-Reply], and [Embed Code] tabs to confirm your form settings (Figure 3). Click here to leran how to customize your form settings
16. Complete the form by clicking the [Save and Insert Form] button
17. The Form Builder window closes and the form code will be inserted into the WCO WYSIWYG control on the page
18. Switch to [Preview] mode to see the form on your page
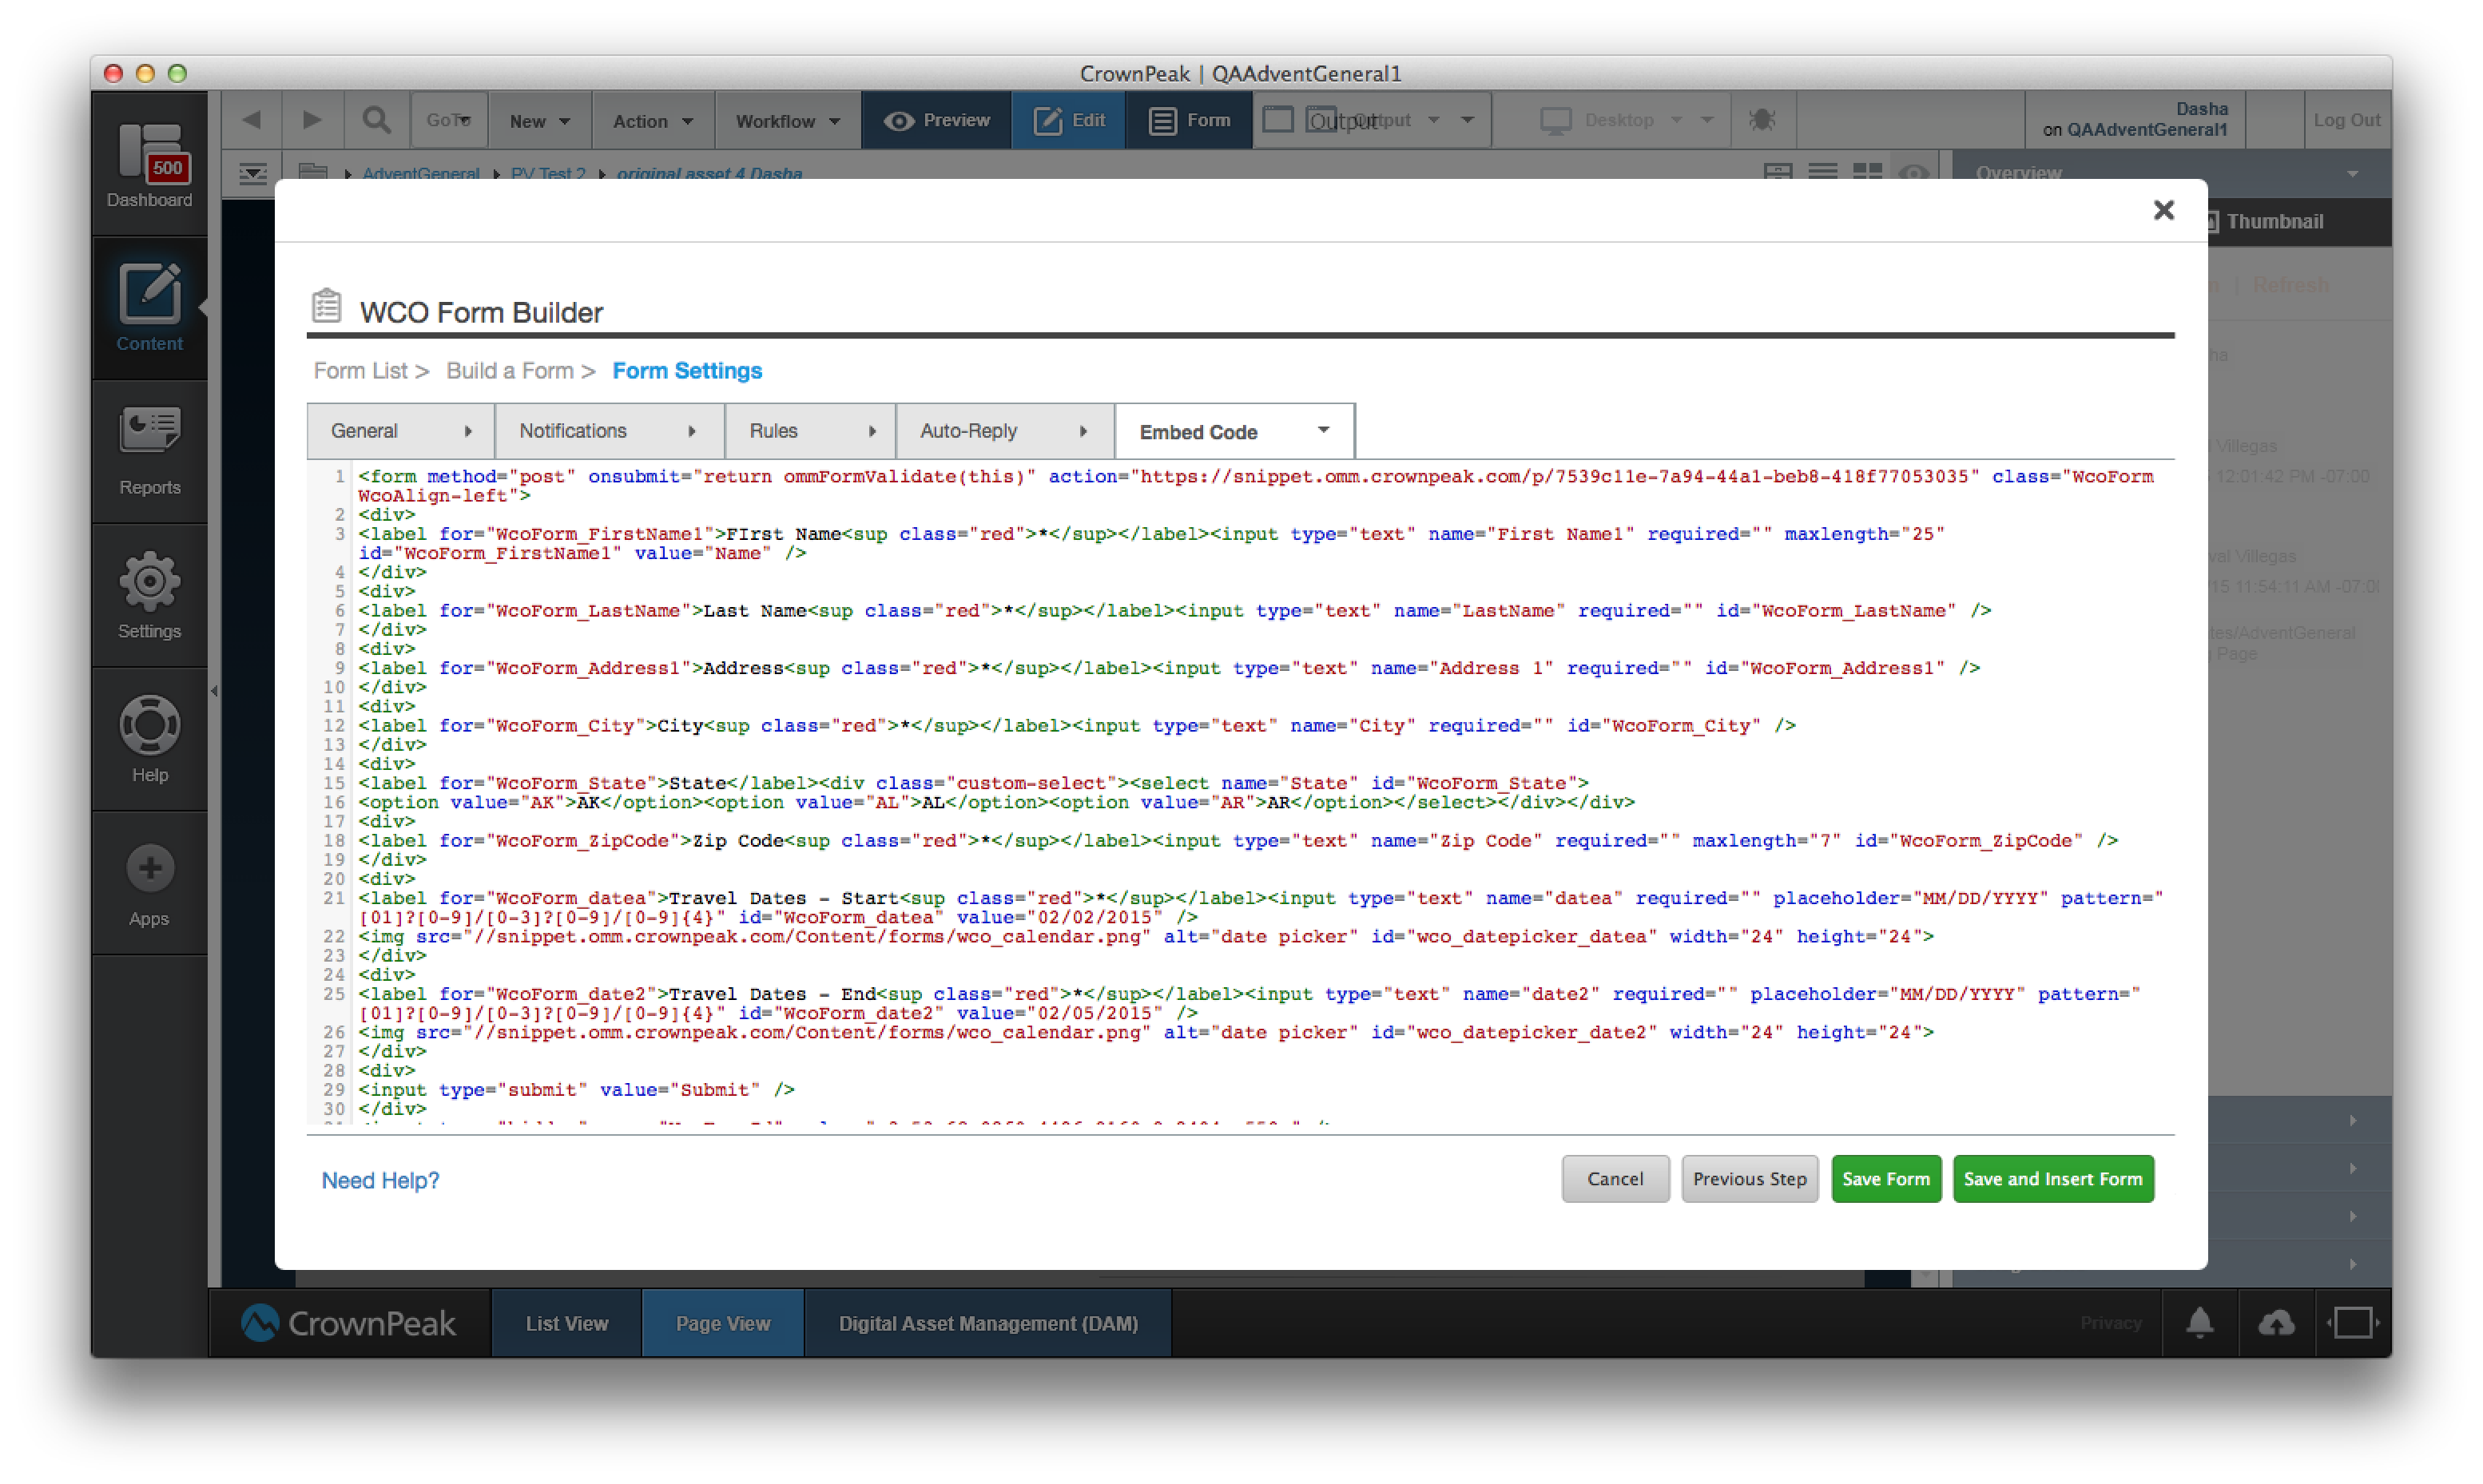
Figure 3 – Form Builder – Optional Embed Code View
How to Customize the Form Settings
The form settings are organized in tabs offering you a number of settings and form attributes to customize your form experience. The following sections describe each setting and its function
General
This section contains general settings about the form
| # | Setting | Definition | Required |
|---|---|---|---|
| 1 | Form Name | A unique name to identify your form. This name will appear in the Form List and can be used in Search to quickly locate your form | Yes |
| 2 | Transmit form via HTTPS Connection (Yes / No) | An option to transmit the collected data over a secure connection. This is important when you are collecting sensitive and personal information | No |
Notifications
This section contains settings and options to send the collected form data to one or more recipients via email
| # | Setting | Definition | Required |
|---|---|---|---|
| 1 | Send an Email (XML / Text) | An option to send the collected form data in XML or Text. XML is useful if the data is meant to be processed by a service or an application Text is useful if the data is meant to be consumed by a person |
No |
| 2 | Add Recipient Email Address | A list of one or more email addresses to receive the collected data | No |
| 3 | Sender Email Address | Select the email address you want to designate as the sender of the email | No |
| 4 | Email Subject | The subject of the email | No |
| 5 | Email Body | Additional content to be added to the body of the email, in addition to the collected form data | No |
Rules
This section contains settings regarding the form experience post submission
| # | Setting | Definition | Required |
|---|---|---|---|
| 1 | What is the Redirect URL? | WCO will redirect the user to this URL upon submitting the form | Yes |
| 2 | Connectors | Using the provided menu, you can select where to post data to, in addition to storing it directly in WCO. You may select from Salesforce, Marketo, Elquoa, and many other connectors. |
No |
Auto-Reply
This section provides options to configure a custom and personalized message to the web visitor via email
You may insert any form field value that was collected as part of the form submission, in the body of the email. For example, if the user provided their first name in a form field called first_name, then you may add a personalized greeting, for example, to your message as follows: Hi $VARS[first_name]
| # | Setting | Definition | Required |
|---|---|---|---|
| 1 | Recipient Address Field | Select the form field that contains the web visitor's email address | Yes |
| 2 | Sender Email Address | Select the email address you want to designate as the sender of the email | Yes |
| 2 | Email Subject | The subject of the email | Yes |
| 2 | Email Body | Non-HTML content of the email, meant for text email clients | Yes |
| 2 | HTML Email Body | HTML content of the email, meant for HTML compatible email clients | Yes |
| 2 | BCC Recipients | Optionally, you may provide a BCC list of recipients | No |
Advanced CSS Stylesheet Topics
CrownPeak has provided 5 sample Cascading Style Sheets (CSS) formats that can be used in the WCO Form Builder preview window and on your web site. These CSS formats will overwrite the styling of just the form in the WYSIWYG control on your page.
Developers can also download these CSS formats, update them and add them back into the CMS for later use. Click the Download link to the right of the style sheet name
| # | CrownPeak CSS | Use Case | Action |
|---|---|---|---|
| 1 | No Stylesheet | Alignment only css | Download |
| 2 | Classic | Simple design and colors | Download |
| 3 | Formal | Update fonts and colors | Download |
| 4 | High Contrast | Selected fields and button stand out | Download |
| 5 | Modern | Bold look with strong background color | Download |
Here are the steps to update the basic CSS formats in the WCO Form Builder:
1. Download the appropriate CSS format from the table above
2. Update the CSS as desired
3. Login to the CMS
4. Switch to the [Content] section of the CMS
5. Navigate to your website or Project directory (ie: \ ..\_Asset\css\)
6. Select [New][Upload][Select] to add the updated CSS back into the CMS
7. Use the [GoTo] menu to navigate back to your asset
8. Switch to [Edit] mode and find the WCO WYSIWYG control
9. Click in the control and switch to the source code mode [<>]
10. Replace the line: link.href = '//snippet.omm.crownpeak.com/Content/forms/highcontrast.css'; with the following line: link.href = '<%= asset.UploadedFiles["my_css"].GetLink() %>';
Here is an example of the "CrownPeak: Name & Comment" sample form using the "High Contrast" CSS format:
Here is the HTML form code that was automatically generated from the WCO Form Builder directly in the CMS authoring experience:
< form method="post" onsubmit="return ommFormValidate(this)"
	action="https://snippet.omm.crownpeak.com/p/c9aea9e5-aa7d-487e-b1a8-d97b003bef70"
	class="WcoForm WcoAlign-left">

	< span>
		< label for="WcoForm_CP_Name">Name:< sup class="red">*
		< input type="text" name="CP_Name" required="" placeholder="Name" maxlength="12" id="WcoForm_CP_Name" />
	< /span>

	< span>
		< label for="WcoForm_CP_Comment">Comment< sup class="red">*
		< textarea name="CP_Comment" required="" id="WcoForm_CP_Comment">
		Your comments here
	< /span>

	< span>
		< input type="submit" value="Submit" />
	< /span>
	< input type="hidden" name="WcoFormId" value="36d04256-5a52-4d3c-bf77-7c1e8d42bf36" />
< /form>

< script type="text/javascript">//
< /script>

< script type="text/javascript">
	//
< /script>